Six easy steps to book Russian Railways tickets online
Our first time purchasing a ticket from the English Russian Railways site was quite a hassle. While the website was in English, we did not understand how the booking system worked. We did not know what was a car plan and how to go about selecting seats. (We spent 15 minutes trying to get the system to approve our passport numbers.)
But we persevered because a purchase online excluded travel agency commission fees, allowing us savings of about USD160 (SGD200). On my second try while writing this tutorial, it’s certainly much easier and definitely worth a try. Just arm yourself with some patience, a Google translate page and most importantly, this blog post.
Google translate is useful for keying in destinations in Russia which English names do not pop up on the destination selection page. That being said, most key destinations are covered in the English search field.
Do take note that the e-ticket is not a confirmed train ticket. You will have to bring your passport and e-ticket to the train station in advance to exchange it for a confirmed ticket. Be at the train station at least an hour before departure.
Six easy steps to book Russian Railways tickets online
Step 1: Set up an account with the Russian Railways
You will need an account with Russian Railways to purchase tickets. This step is pretty straightforward.
Step 2: Login and proceed to check the train schedules. Select the train number with the departure and arrival timings that are agreeable with you.
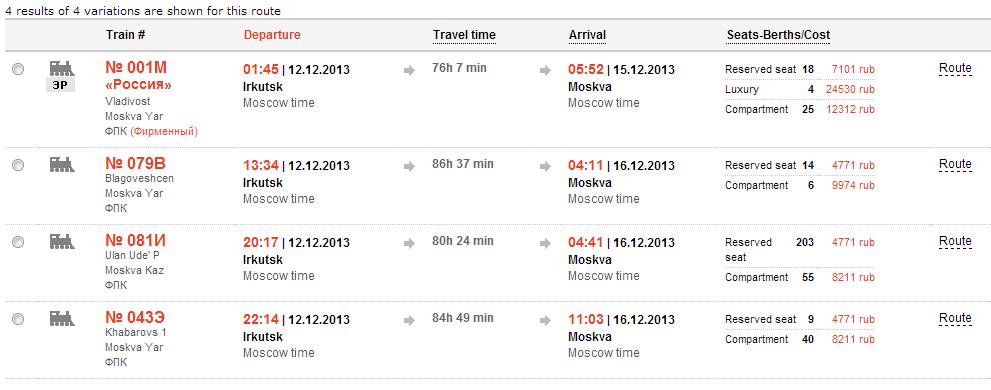
You will see a list similar to the screenshot below. It gives you the train departure and arrival timings, as well as the number of seats and berth costs. To learn more on the various types of train classes, pricing and pictures, click here: Trans Siberian Tickets and Pricing
Here’s what the description on the site refers to:
- Reserved Seat – 3rd Class
- Compartment – 2nd Class
- Luxury – 1st Class

Select the type of train based on the available timings/ seats available and click continue.
Step 3: Select the car number if you are agreeable with the car plan

There is usually only one choice of train car available. Remember to check the car plan (see screenshot above). When making a booking closer to the date of departure, it is common for the lower berth seats to be taken up completely. See if that is agreeable with you before moving on to the next step.
When you click on Car Plan (Right hand side link in red), a window opens up showing you the berth seats in the car. In this case above, the seats in grey have already been taken up, only leaving seats in white – 7 upper berth spaces available.
Step 4: Enter Passenger Details and seat preference
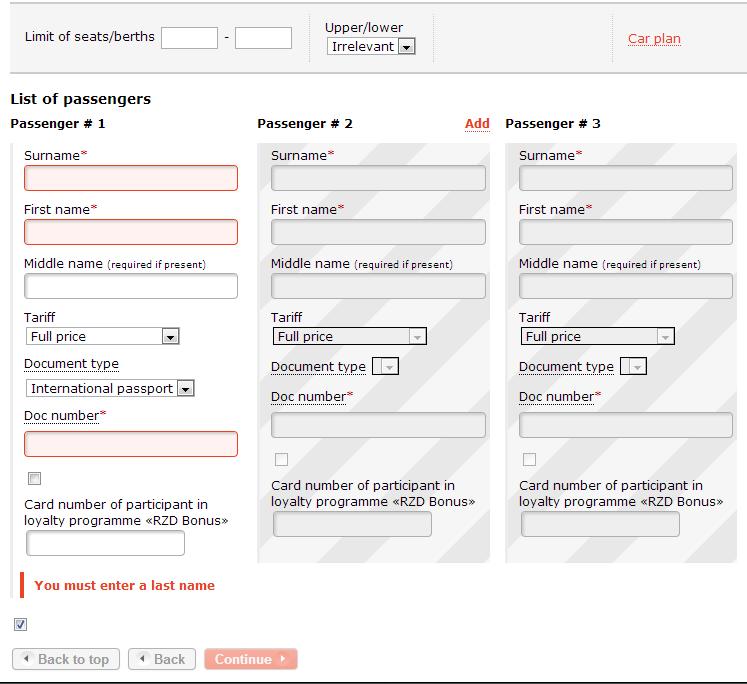
Click Continue and you will be brought to the page below:

On the top of the page, you will see a section, “Limit of seats/berths”
This is akin to a seat preference indicator, in which you can provide a range of seats you wouldn’t mind taking up. Pull out the car plan once again to view the seat availability.
In this case, Upper berth seats of 20, 22 and 24 are available in white, so are 30, 32, 34 and 36. I do not like seats near the ends of the train car due to its proximity to the toilet and whiffs of cigarette smoke, hence I have indicated my preference for 20, 22 and 24. Simply click 20 and 24 on the small window, or you can type in the numbers (smallest in the first field, and biggest in the second).
If all lower berths are fully booked, the Upper/ Lower berth preference is “Irrelevant”.

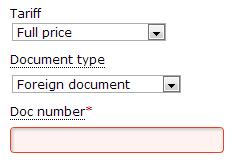
Entering of passenger details is pretty straight forward. Though for Singaporeans take note – when entering your passport number under the field “Doc number”, click on the category “Foreign Document” as oppose to “International Passport” in the “Document type” field (see below). You will not be able to proceed if your passport number and characters do not match the requirements of each category.
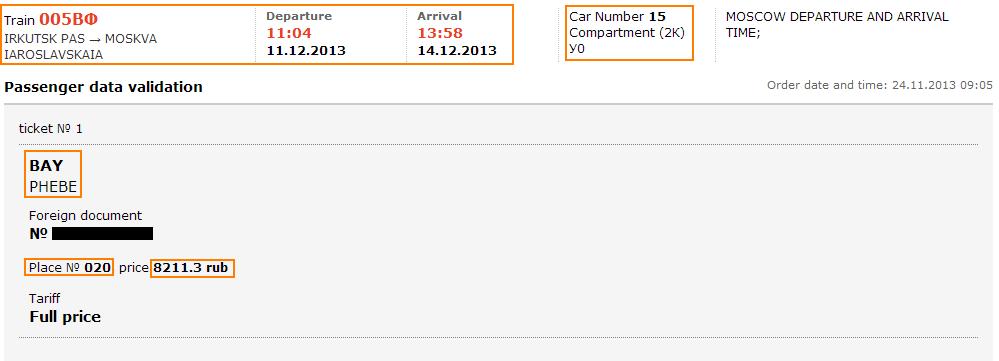
The berth assigned to you will be indicated in this page. Check if all details are correct eg. Journey timings, name, passport number, seat number and price. (See red boxes)
This step is very straight froward. Just like making any other payments online, key in your credit card details. Visa and Mastercard are accepted.
Should you need to make any changes, you can press the back button on your browser. For Steps 2 -5, a “Back” option is available next to the “Confirm” button on the bottom left hand side of the page.
Good luck! Feel free to reach out should you have any questions.


Leave a Reply